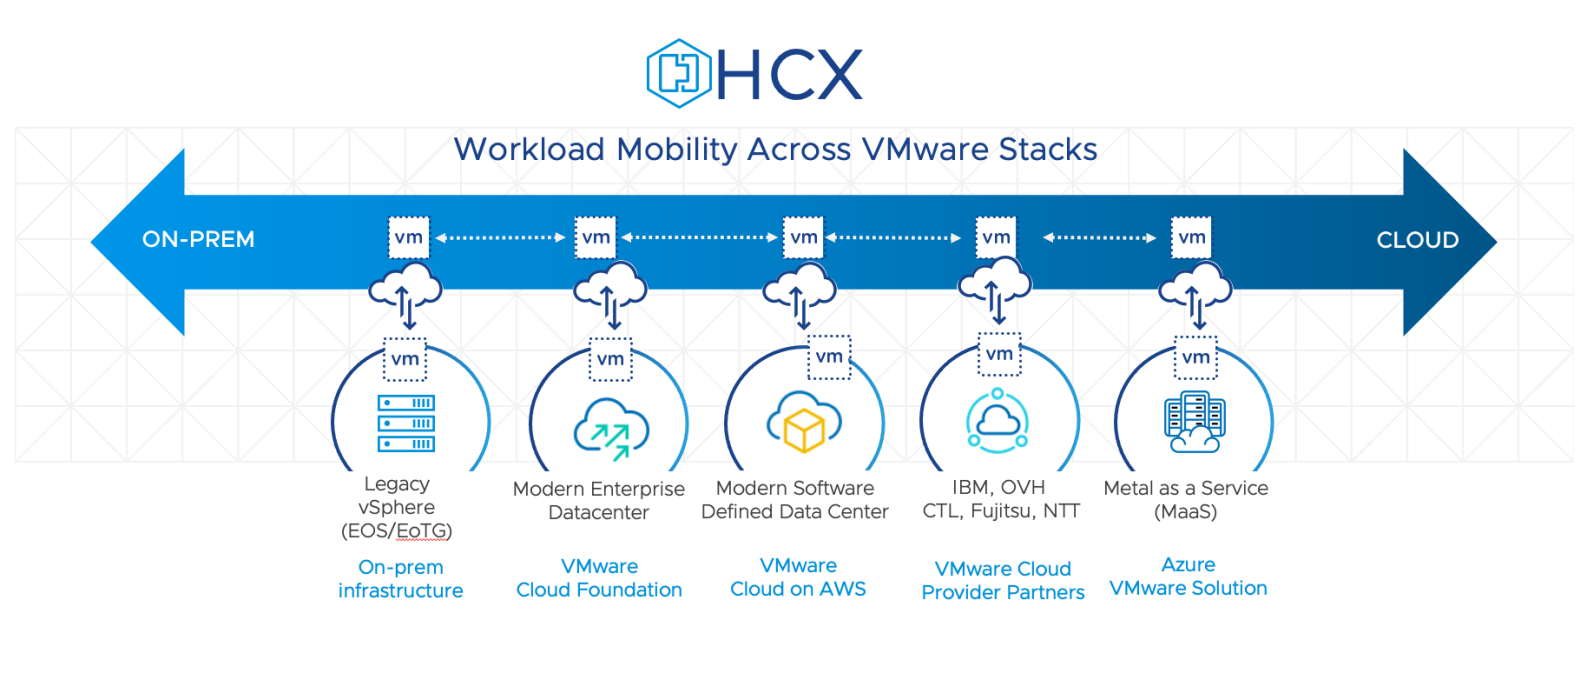
VMware HCX (Hybrid Cloud Extension) is a software solution that enables organizations to migrate and extend their VMware-based workloads between data centers, on-premises data centers, and public cloud environments. HCX provides a seamless and secure way to extend the capabilities of VMware vSphere by enabling workload mobility and disaster recovery across different environments.
HCX is designed to work with VMware vSphere environments and is fully integrated with vCenter Server. HCX uses a set of virtual appliances to provide its features, including the HCX Manager, HCX Connector, and HCX Cloud Gateway.
Migrating a virtual machine (VM) from an on-premises VMware infrastructure to VMware Cloud on AWS (VMC) using HCX involves several steps.
Preparation
Before you can use VMware HCX (Hybrid Cloud Extension), there are several prerequisites that you need to meet. These prerequisites are essential to ensure a smooth and successful deployment of HCX. Here are the most critical prerequisites for using HCX:
- VMware Licenses: You must have valid VMware licenses to use HCX. HCX is an add-on to VMware vSphere, requiring vSphere Enterprise Plus licenses to use all its features.
- VMware vSphere Versions: HCX requires vSphere versions 6.0 or higher on both the source and target sites. Additionally, the vSphere environment must be managed by vCenter Server.
- Network Connectivity: You must have a network connection between the source and target sites. HCX requires a minimum bandwidth of 250 Mbps per HCX Connector to ensure optimal performance.
- HCX Appliances: HCX requires the deployment of several virtual appliances, including the HCX Manager, HCX Connector, and HCX Cloud Gateway. These appliances require specific hardware resources, such as CPU, RAM, and storage, which must be provisioned before deploying HCX.
- Firewall Rules: You must configure firewall rules to allow traffic between the HCX Manager, HCX Connector, and HCX Cloud Gateway appliances. You should also configure the firewall rules to allow traffic between the source and target sites.
- VPN Connectivity: If you migrate virtual machines between a private data center and a public cloud, you must establish a VPN connection between the two environments. This VPN connection ensures secure and reliable communication between the source and target sites.
- DNS Configuration: HCX requires a DNS server to resolve hostnames and IP addresses for the HCX Manager, HCX Connector, and HCX Cloud Gateway appliances. You should configure your DNS server to resolve these hostnames to their IP addresses.
Deployment of HCX Components: HCX includes several components that must be deployed on the on-premises infrastructure and the VMC SDDC. These components include:
- HCX Manager: This component provides a single pane of glass for managing the migration process. It is deployed as a virtual appliance in the on-premises infrastructure and the VMC SDDC.
- HCX Connector: This component facilitates communication between the on-premises infrastructure and the VMC SDDC. It is also deployed as a virtual appliance in both environments.
- HCX Cloud Gateway: This component manages network traffic between the on-premises infrastructure and the VMC SDDC. It is deployed as a service in the VMC SDDC.
Different HCX migration types
HCX supports multiple migration types:
- vMotion: HCX supports vMotion, which enables live migrations of virtual machines between different vSphere clusters and vCenter servers without requiring a shared storage infrastructure. This enables administrators to move virtual machines between data centers or cloud environments without downtime.
- XvMotion: HCX supports XvMotion, which enables cross-vCenter vMotion migrations of virtual machines across different vSphere clusters and vCenter servers. XvMotion enables administrators to migrate virtual machines between vSphere environments not in the same SSO domain.
- Layer 2 (L2) Extension: This type of bulk migration enables virtual machines to be moved between data centers without changing their IP addresses, MAC addresses, or network settings. L2 Extension creates an extended Layer 2 network across the source and target data centers, enabling virtual machines to retain their original network identity during migration. L2 Extension is useful for migrating large numbers of virtual machines, as it simplifies the migration process and reduces the amount of reconfiguration required after the migration.
- Layer 2 (L2) Stretching: This type of bulk migration enables virtual machines to be moved between data centers while retaining their IP addresses, MAC addresses, and network settings. L2 Stretching creates an extended Layer 2 network between the source and target data centers, enabling virtual machines to retain their original network identity during migration. L2 Stretching is useful for migrating virtual machines with strict network requirements or is part of a multi-tier application.
- Cold Migration: This migration type involves shutting down the virtual machine before migrating it. Cold migration is beneficial when you need to migrate virtual machines that cannot be live-migrated, such as those with physical devices attached.
HCX also supports disaster recovery (DR) migration, a bulk migration used to replicate virtual machines to a DR site. In a disaster, virtual machines can be powered on at the DR site, ensuring business continuity.
Create Migration Group
Creating the Migration Group: The next step is to create a migration group in the HCX Manager. A migration group is a logical grouping of VMs that are migrated together. To create a migration group, follow these steps:
- Log in to the HCX Manager console using your administrator credentials.
- From the HCX Dashboard, click the “Migration” tab in the left-hand navigation menu.
- Click on the “Create Migration Group” button in the screen’s upper right-hand corner.
- In the “Create Migration Group” window, enter a name for the migration group.
- Select the source vCenter and destination vCenter servers from the drop-down menus.
- Select the migration type you want to use (such as vMotion or Bulk Migration).
- Select the virtual machines you want to include in the migration group by manually selecting them or applying a filter to the virtual machines list.
- Click the “Create” button to create the migration group.
Once the migration group is created, you can monitor the migration progress from the HCX Dashboard. The migration group will display information such as the number of virtual machines, the migration type, and the migration status.
Test Migration
- HCX Mobility Optimization: This feature enables administrators to test the performance of their network connections between the source and target data centers and the impact of different network configurations on virtual machine migrations.
- HCX Migration Assessment: This feature enables administrators to analyze the virtual machines in their environment and determine their suitability for migration. The migration assessment provides detailed information on the virtual machine’s configuration, network connectivity, and compatibility with the target environment.
- HCX Migration Pre-Check: This feature enables administrators to test the migration process and identify any issues before the migration occurs. The pre-check ensures that all virtual machines are compatible with the target environment and that the migration will complete successfully.
- HCX Test Migration: This feature enables administrators to perform a test migration of virtual machines to the target environment. The test migration ensures that the virtual machines are compatible with the target environment and that the migration process will complete successfully without any issues.
To perform a test migration in HCX, follow these steps:
- Select the virtual machines you want to migrate and create a plan.
- In the migration plan, select the “Test Migration” option.
- Configure the test migration settings, such as the migration type, network settings, and virtual machine settings.
- Start the test migration and monitor the progress.
- Once the test migration is complete, verify that the virtual machine has migrated successfully and functions as expected in the target environment.
Performing a test migration is a crucial step in the migration process, as it enables administrators to identify and address any issues before the actual migration takes place.
Migration
To migrate a virtual machine using HCX after running a test, you need to select the virtual machine(s), create a migration plan, configure the migration settings, run the pre-check, start the migration, and verify that the virtual machine is functioning as expected in the target environment.
- Once the test migration is complete, start and monitor the progress from the HCX Manager console or the vCenter Server console.
- After the migration, verify that the virtual machine functions as expected in the target environment.
Summary
VMware HCX (Hybrid Cloud Extension) is a powerful solution for cloud migration that provides organizations with a seamless and efficient way to migrate workloads from on-premises data centers to the cloud. Here are some key reasons why VMware HCX is the best solution for cloud migration:
- Comprehensive Migration Support: VMware HCX supports various migration types, including vMotion, Bulk Migration, Cold Migration, and Replication-Assisted vMotion. This comprehensive support makes it easier for organizations to migrate workloads of any size, type, or complexity to the cloud.
- Minimal Downtime: VMware HCX enables live migration of workloads, minimizing downtime and ensuring continuity of business operations during the migration process. This minimizes the impact of the migration on end-users and reduces the risk of data loss.
- Seamless Integration: VMware HCX integrates with multiple cloud providers, including VMware Cloud on AWS, Azure VMware Solution, and Google Cloud VMware Engine. This seamless integration makes it easy for organizations to migrate workloads to their preferred cloud provider without complex and time-consuming migrations.
- Network Optimization: VMware HCX provides built-in network optimization features that ensure high-performance, low-latency connectivity between on-premises data centers and the cloud. This enables organizations to maintain the same network performance and security level in the cloud as in their on-premises data centers.
- Security and Compliance: VMware HCX provides robust security and compliance features, including encryption, secure tunneling, and multi-factor authentication. This ensures that sensitive data remains secure during the migration process, and that organizations remain compliant with relevant regulations and standards.
By using VMware HCX, organizations can migrate workloads to the cloud quickly, efficiently, and securely, while minimizing the impact on business operations.